
Best Lighting for Professional Headshots
When I started with headshot photography, I quickly learned that lighting for professional headshots is the real game-changer. It’s not just about pointing a camera at someone’s face and hoping for the best. The way you light your subject can make or break the final image. Over time, I’ve tried everything from window light to fancy studio setups, and honestly, even the simplest changes can have a huge impact on how polished and flattering your photos look. Whether you’re shooting for a big company or just helping a friend update their LinkedIn, getting the lighting right is what sets a snapshot apart from a professional headshot.
Why Lighting Matters in Professional Headshots
Lighting is one of those factors that separates a regular snapshot from a polished, professional headshot. The best lighting for professional headshots highlights the subject's features, keeps skin tones looking natural, and brings out the details in hair, eyes, and clothing. If the lighting's off, you might end up with harsh shadows, washed-out faces, or a background that fades into nothing.
Good lighting shapes the face, making jawlines neater and skin smoother.
It controls shadows—too much, and a person looks tired; too little, and their features go flat.
It helps set the mood, whether you want something bold and dramatic or light and friendly.
Lighting is the single most important tool for making people look their best in a headshot. I find that even the latest, highest-end camera can’t save an image if the light isn’t doing its job.
I always tell clients that with the right lighting, everyone looks more confident, approachable, and ready for business opportunities.
Sometimes, you have to experiment—subtle tweaks can make a big difference. The right lighting not only flatters people but also makes headshots consistent, which is especially useful if you’re shooting for commercial clients or companies with specific branding needs.
Choosing Between Natural vs Artificial Light
When I'm deciding between natural and artificial light for headshots, I look at more than just convenience. The way a face looks in a photo can change dramatically depending on which one I pick.
Here's how I think about it:
Natural Light
Artificial Light
Here's a quick comparison in table form:
| Feature | Natural Light | Artificial Light |
|---|---|---|
| Consistency | Low | High |
| Control (brightness, angle, color) | Low | High |
| Setup Time | Minimal | Moderate |
| Learning Curve | Simple | Needs Practice |
| Portability | High | Varies |
For headshots, I usually lean toward artificial light in most situations, just because I know exactly what to expect. But if I’ve got a beautiful window and a relaxed schedule, working with natural light feels honest and easy.

Building Blocks: Three-Point Lighting Essentials
When I talk about professional headshots, three-point lighting always comes up. It’s the backbone of classic portrait setups because it gives control over shadows and highlights while adding depth to the subject’s face. If you want results that work across different faces and settings, three-point is where you start.
Here’s how I break three-point lighting down:
Key Light – This is your main light source. I usually set it slightly above eye level and off to one side of the camera. This light shapes the face and brings out key features.
Fill Light – I use this to soften shadows made by the key light. The fill light goes on the opposite side, usually at a lower power, so the face doesn’t look too flat but isn’t lost in darkness either.
Back Light (or Hair Light/ Rim Light) – This one sits behind or above the subject. It adds separation between the subject and background, stopping the person from blending into the backdrop. When it’s done right, it catches the edge of the hair and shoulders, giving that extra pop.
I keep adjustments simple – sometimes I swap the fill for a bounce reflector, softening shadows without needing a second light. For a studio look, I might boost the back light if I’m shooting with a dark background.
The trick is making constant small tweaks—subtle changes in angle, distance, and power can totally change the mood of a headshot.
No matter how fancy lights get, the three-point approach is the quickest way I know to get professional-looking headshots, whether you’re using LED panels, strobes, or natural light with modifiers.
One-Light Headshot Setup for Quick & Effective Results
When I want to keep things quick and straightforward, I always fall back on a tried-and-true one-light setup for headshots. This approach is ideal if you need great results but don’t want to fuss with a bunch of gear or waste precious time.
Here’s how I tackle a one-light headshot session:
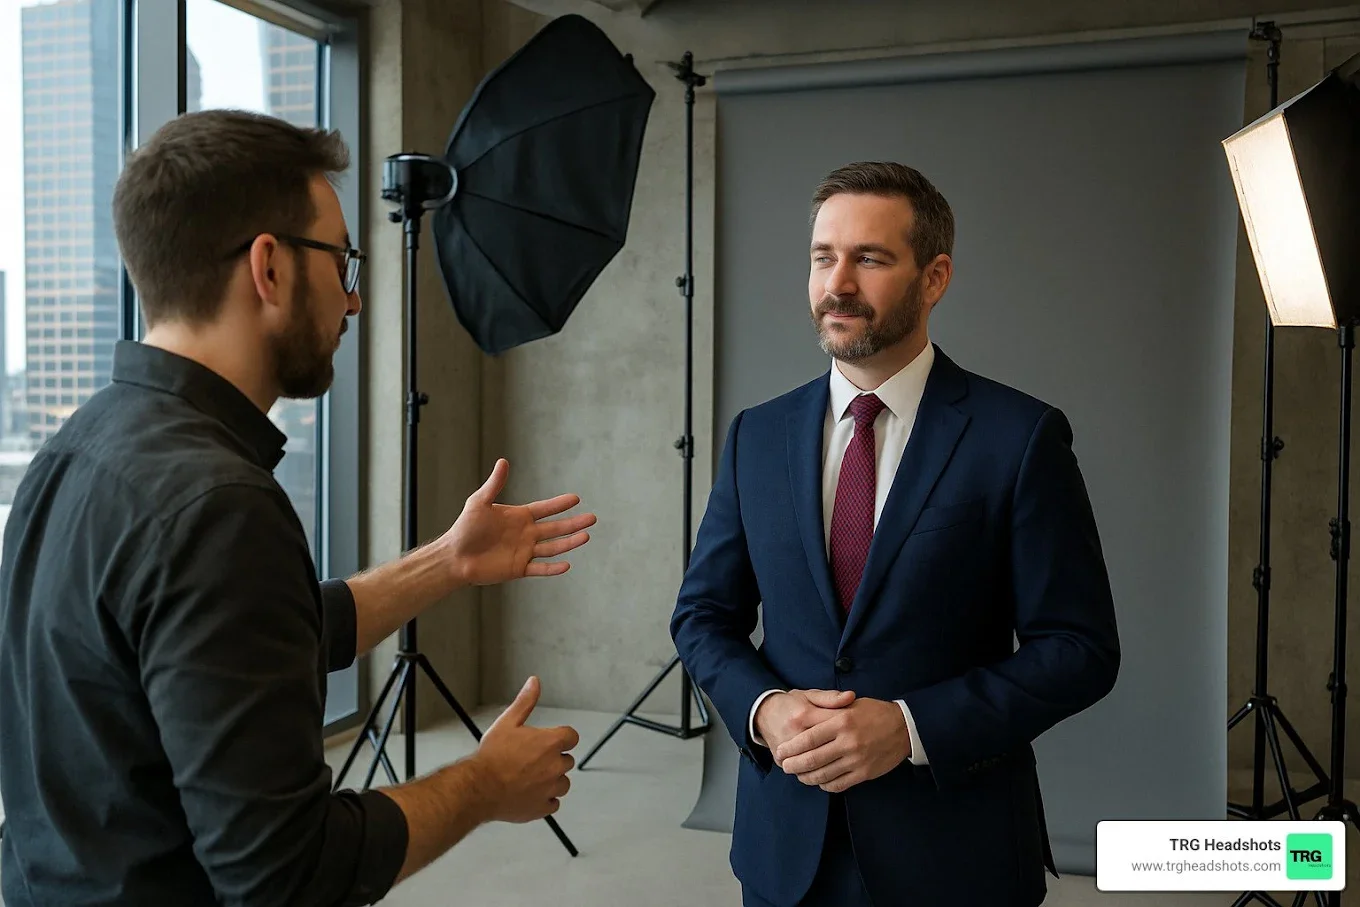
I use a single, large softbox as my key light—usually off to one side, either left or right, and slightly above the subject’s eye line. A bigger light source helps keep the shadows on the face smooth, so nobody ends up looking harsh or dramatic unless that’s what I’m after.
To soften the shadowed side, I place a reflector just below the face or at an angle opposite the main light. This bounces back some light, which lifts the shadows and gives a natural, flattering look.
If I want more definition, I’ll switch to a black-sided reflector or even nothing at all to let one side of the face fall into a bit more shadow, adding dimension.
You don’t need much to make this setup work—just the main light and something to reflect. I end up shooting nearly all my quick corporate headshots this way because it’s reliable and always looks professional.
With just one light and a little bit of practice positioning it, I’ve been able to create headshots that appear carefully crafted, even when I’m on a tight schedule or working in someone’s cramped office.
Honestly, if you’re just starting or you want an efficient routine, this is the method to master. It’s simple, repeatable, and fits almost any type of face or business portrait.
Clamshell Lighting for Soft, Flattering Beauty Headshots
Clamshell lighting is one of my go-to techniques when I want a soft, flattering look for headshots. What sets clamshell lighting apart is how it wraps the face in gentle light, evening out skin tones and minimizing harsh lines. The name comes from the way the two main light sources are positioned—one above the subject, angled downward, and another (or a reflector) beneath, angled up. This setup creates a kind of symmetrical, shell-like effect, which helps to bring out someone's best features.
Here's how I usually set it up:
Place the main light (typically a softbox or beauty dish) just above and in front of the subject, angled down about 45°.
Add a second light or a white reflector directly below the subject's face, angled up, to fill in any shadows under the chin and eyes.
Control the lower light's power so it doesn't overpower the key light—it should be noticeably softer.
I've noticed that using a honeycomb grid on the top light can target the effect and keep unwanted light from spilling onto the background. This slight tweak gives nice contrast to your images, helping bone structure pop without creating harsh or unflattering shadows.
When I want that polished "beauty shot" look, clamshell lighting rarely disappoints. It's beginner-friendly and shines for glamor or corporate portraits.
If anyone's looking for an easy starting point in portrait lighting, timeless portrait lighting techniques like the clamshell are a solid choice. Even with just one light and a reflector, you can pull off something close to the real thing—it’s all about finding that sweet spot for light placement and power.
Loop Lighting: Natural Depth with Subtle Shadows
When I work with headshots, I often come back to loop lighting. It's a simple yet solid lighting pattern that gives a headshot just enough shape without harsh shadows. Loop lighting is named for the little loop-shaped shadow that falls beneath the nose, and achieving this effect isn't complicated at all.
To set this up, I usually place my main light slightly above eye level and about 30-45 degrees off to one side of the subject. The key is finding just the right spot so that the nose shadow doesn't merge with the shadow from the cheek, but instead sits on the upper cheek. Softboxes or umbrellas are great for this because they help keep the light gentle and flattering.
Here's how I go about it:
Place the key light 30–45 degrees to one side, a bit higher than the subject's eyes.
Angle the light down toward the face without letting the shadows become too harsh.
Use a reflector or a low-powered fill light on the opposite side to keep shadows under control but still present.
If you're aiming for a professional look, especially for business portraits, loop lighting brings a nice balance. It keeps the face looking three-dimensional and avoids that flat, mugshot feel—perfect for a setting where clear facial features matter, like financial advisor headshots.
Loop lighting is a favorite in my toolkit because it works well with all sorts of faces and settings, and it can be made softer or more dramatic just by shifting the light or adding a reflector.
Experiment with the angle and distance, and don't be afraid to take a few test shots. Tiny adjustments make the difference between a dull look and a photo that feels alive. If you stick to these steps and use soft, controlled light, most people look their best—and that's the goal with any headshot.
Rembrandt Lighting for Artistic Dimension
Rembrandt lighting is one of those classic techniques that instantly gives a headshot depth and interest. The distinctive triangle of light underneath the subject’s eye on the shadow side of the face is what sets this method apart. To create it, I set up a single light source at about 45 degrees from the subject and slightly above eye level—then I ask the subject to turn their face just enough to catch that telltale triangle on their cheek.
Here’s my usual step-by-step approach to getting Rembrandt lighting right:
Position your key light on one side at a 45-degree angle and just above the subject’s head.
Have the subject turn their head slightly toward the shadow until a triangle-shaped highlight forms under the opposite eye.
Use a reflector or fill light (if needed) opposite your main light to brighten up heavy shadows, but keep them subtle for drama.
Rembrandt lighting is right at home in professional headshots for those looking for a bold, artistic vibe. It makes cheekbones pop and adds just enough shadow to hint at mystery or strength, which can work well for actor headshots, personal branding, or portraits where personality matters. Emotional expression and technical lighting blend nicely using this setup.
When I rely on Rembrandt lighting, I find it’s the balance between highlight and shadow that shapes a person’s face. It isn’t for everyone, but it never fails to add character when you need something a bit more striking.
Split Lighting for Bold, Edgy Headshots
When I want headshots that feel strong and a bit mysterious, I lean into split lighting. This technique divides the face into equal parts of light and dark, giving portraits a striking and moody style. It works perfectly for subjects who want an edgier look or who just plain love a dramatic vibe.
To get split lighting, I position a single light to the side of the subject's face—sometimes even a bit behind them. One half of the face gets all the light, while the other sinks into shadow. It’s not a soft and forgiving style, but it creates character fast. If you want to experiment, check out a detailed description of how to create split lighting with simple light placement in this overview of split lighting techniques.
Here’s how I typically set it up:
Place your main light directly to the left or right of your subject, at about head height.
Turn your subject so their nose points toward the camera, with the light hitting one side only.
Double-check that the shadow runs right down the middle of their nose and mouth.
A basic table for your setup:
| Light Position | Effect on Subject |
|---|---|
| Left or Right (90°) | One side lit, one in the dark |
| Slightly Behind | More intensity, sharper split |
| Higher or Lower | Changes the shadow shape |
Split lighting is all about attitude. Subjects with strong jawlines or expressive faces look fantastic, but if someone prefers a gentle, soft look, I’ll usually steer them away from this style.
I always remind myself that split lighting can exaggerate texture—think deep lines, pores, or wrinkles. That’s sometimes exactly what I want, but it doesn’t flatter everyone. If the mood calls for drama and edge, though, split lighting is a go-to choice.
Modifiers & Reflectors: Softboxes, Beauty Dishes, Umbrellas & Bounce
Lighting modifiers and reflectors completely change how your headshots look and feel. Choosing the right one can turn a basic portrait into a polished, professional image. I like to experiment with a few different setups, even when I'm keeping things simple.
Here's how I think about some common tools for pro headshot lighting:
Softboxes: These are my go-to for soft, even lighting. They spread the light out, reduce harsh shadows, and are especially handy if the goal is gentle, flattering skin tones. The bigger the softbox, the softer the light. I’ve found rectangular and octagonal (octabox) types both work well for face shots.
Beauty Dishes: Beauty dishes create a brighter, punchier look than softboxes, with crisp highlights in the eyes. They’re great for adding a slight edge and making facial features pop. I usually add a white or silver interior for more softness or sparkle.
Umbrellas: Umbrellas are affordable and portable. I use them when I need to set up and take down quickly. They can make light broad and forgiving, but they don’t control spill as much as softboxes or dishes – so they’re good in bigger spaces.
Reflectors/Bounce: Sometimes, all it takes to fill deep shadows is a $20 reflector or a piece of white foam board. I’ll position one beneath the subject’s chin or off to the side, bouncing light back into the face for extra glow and more defined eyes. This trick is pretty much foolproof because you can’t overpower your key light with a reflector.
Even if you’re working with one light, adding a simple reflector below your subject can totally change the mood, pulling out shadows and making the shot more lively. Simplicity often works best—no need to go overboard with gear if a few smart modifiers can do the job.
| Modifier | Softness Level | Portability | Control of Light |
|---|---|---|---|
| Softbox | High | Medium | High |
| Beauty Dish | Medium | Medium | Medium |
| Umbrella | Medium | High | Low |
| Reflector | Variable | High | Low |
Using Backlights & Background Lighting for Separation
When I shoot headshots, one thing I always keep an eye on is how the subject stands out from the backdrop. Backlights and carefully managed background lighting make a huge difference here, giving your photos a crisp, professional edge. It doesn't take an army of lights—just a bit of strategy in where you place what you already have.
One simple approach is to use a kicker, sometimes called a rim light, to add a bright line along your subject's hair or jaw. This sliver of light carves the person out of a dark or busy background, making their features pop. I've found a stripbox with a grid behind and offset from my subject works great, but honestly, you can get creative; even a speedlight with a DIY snoot does the trick if you control the spill.
If I'm working with a lighter or white backdrop, then I may put one or two lights pointed right at it. This makes the background clean and even, so easy to match for later sessions if I need consistency for a client. If space is tight, I stick to one. But two lights will create a broader spread, reducing shadows and making those white backgrounds look even and professional (creative backlighting techniques).
Here's what I usually think about when setting backlight and background lighting:
Always aim the rim or backlight slightly toward the back of the subject—avoid direct spill into the lens to prevent lens flare.
Adjust the power so the backlight is just bright enough to separate, without blowing out edges.
Use grids, snoots, or barn doors when you need to keep the light focused.
For white backgrounds, two lights help prevent dark corners and falloff.
Don't forget: if you reuse the setup, mark your light positions for easy replication.
Having that subtle halo or a perfectly clean background doesn't just look polished—it's what makes portrait clients feel like they're getting premium treatment. It sets headshots apart from smartphone selfies and creates a finish that can't be matched by filters or quick edits.
Practical Tips & Common Mistakes to Avoid
Taking professional headshots can seem straightforward, but there are plenty of easy-to-miss details that really make a huge impact. Lighting is usually the one thing that can set your photos apart—or wreck them. Over the years, I've found myself repeating the same tips to folks who are just discovering how much of a difference the right (or wrong) lighting makes.
Here’s what I keep in mind whenever I shoot, plus a few things I wish someone had warned me about early on:
Always check for color consistency. Mixing different types of light sources (window sunlight, room lamps, and flash) can ruin skin tones. I keep my flash at a set daylight temperature, turn off overhead lights, and just work with one or two sources.
Watch the catchlights in your subject’s eyes. No matter the look you’re going for, adding at least one visible catchlight adds a sense of life and engagement to the final headshot.
Use reflectors or bounce cards to soften harsh shadows. One of the most common rookie mistakes is too much contrast under the chin or nose. A cheap foam board does wonders.
Take a few test shots and zoom in to check for uneven lighting in the background. Sometimes, the background looks fine in person but shows up blotchy in the photo.
Don’t rely on post-processing to save a badly lit image. A little retouching can smooth things out, but heavy "fixing" usually hurts more than it helps.
These are a few of the biggest missteps I still see:
Placing the main light too high or directly over the face creates deep eye sockets and unflattering nose shadows.
Forgetting to expose for the brightest part of the face—blown-out highlights are impossible to fix later.
Ignoring the background, which should separate the subject and not blend into hair or shoulders.
If something looks just a bit off through the camera, it’s usually much worse on your computer screen. Take a moment to review before your client steps away—one small adjustment can make all the difference.
Want to get the best results from your headshots? Follow these handy tips and watch out for common mistakes. If you want more advice or need a professional headshot, check out our Red Oak Dallas, Texas studio today. We're ready to help you look your best!
Frequently Asked Questions
-
In my experience, soft and even lighting works best for headshots. I often use a large softbox or natural window light to keep shadows gentle and make the person look their best.
-
Both can work well. If I have a big window with soft daylight, I like to use that. But if I need more control, I use artificial lights like strobes or speedlights with softboxes.
-
Three-point lighting uses three lights: a main light, a fill light, and a backlight. I use this setup to shape the face, add depth, and separate the person from the background.
-
Yes, I often use a single light and a reflector. This simple setup can create great results and is easy to repeat if I need to take more photos later.
-
Clamshell lighting means placing one light above and another below the face. I use it when I want a soft, flattering look with bright eyes and smooth skin.
-
I use one or two lights aimed at the background to make it bright and even. If I need to match the look later, I set up the lights the same way each time.
-
I always check for harsh shadows, uneven light, or bright spots on the face. I also make sure the eyes have catchlights and avoid mixing different colors of light.
-
No, I can get great results with a simple speedlight and a reflector. The most important thing is to understand how to place the light and shape it for the best effect.