
Headshot Lighting Setup for Corporate and LinkedIn Photos
When you're trying to make a good impression, especially in the professional world, your headshot is often the first thing people see. Think about it, whether it's for LinkedIn, a company website, or a professional portfolio, that photo is your digital handshake. And honestly, bad lighting can really mess that up. It can make you look tired, washed out, or just plain unprofessional, no matter how nice you are in person.
Why a Good Headshot Lighting Setup Matters for Professional Photos
The right lighting makes a huge difference in how you come across. It can highlight your best features, create a sense of approachability, and convey confidence. On the flip side, harsh shadows or uneven light can be distracting and make it hard for people to focus on what you're saying or what you do.
Here’s a quick look at why getting the lighting right is so important:
First Impressions Count: Studies show people make judgments within seconds. A well-lit headshot signals attention to detail and professionalism.
Conveys Competence: Good lighting can make you look more alert and capable, which is important when potential clients or employers are looking at your profile.
Builds Trust: A clear, flattering image helps build a connection. If your photo looks like an afterthought, it might suggest you don't put much thought into other aspects of your work either.
Consistency Across Platforms: For companies, consistent lighting across employee headshots creates a unified brand image.
Getting the lighting wrong is like showing up to an important meeting in wrinkled clothes. It sends the wrong message before you even open your mouth. A good lighting setup, however, makes you look polished and ready for business.
It’s not just about looking good; it’s about communicating professionalism effectively. A well-executed lighting setup is a simple yet powerful tool in your professional image arsenal.
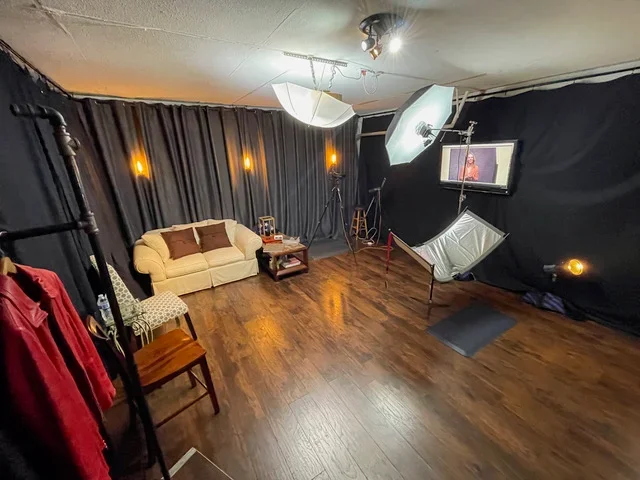
Essential Equipment for an Effective Headshot Lighting Setup
To get a professional-looking headshot, you don't need a whole studio full of gear. You can actually achieve great results with just a few key items. The most important thing is understanding how to use the light you have.

When you're starting, affordable lighting kits are a good way to go. These often come with the basics like a light source, a modifier, and a stand. For continuous lighting, LED lights are usually the most budget-friendly and easiest to work with. They give you a consistent light that's easy to see and adjust in real-time, which is super helpful when you're shooting by yourself.
Light modifiers are what really make a difference in softening your light. Think of umbrellas and softboxes. They spread the light out, filling in those harsh shadows and making your subject look more flattering. While softboxes can be a bit pricier, umbrellas are a solid, more budget-friendly option. A larger umbrella will give you softer light, which is great for portraits, while a smaller one can create a more dramatic effect.
Here's a quick rundown of some common equipment:
Light Source: This could be a continuous LED light or a strobe/flash. LEDs are great for seeing exactly what you'll get.
Light Modifier: Umbrellas and softboxes are popular choices for softening the light.
Light Stand: A standard light stand is usually sufficient. You don't necessarily need the more expensive C-stands unless you need extra stability or flexibility.
Reflector: This is a simple but effective tool. You can use a white piece of cardboard or a dedicated reflector to bounce light back onto your subject and fill in shadows. It's a great way to balance the light without needing a second light source. A simple corporate headshot lighting setup often uses just one light and a reflector.
You don't need to break the bank to get good lighting. Starting with a single light and a reflector can get you surprisingly far. The key is learning how to position and use these tools effectively to shape the light on your subject's face.
Natural vs. Studio Light: Choosing the Right Headshot Lighting Setup
When you're getting ready to take professional headshots, one of the first big decisions you'll face is how to light your subject. You've got two main paths: using natural light or setting up studio lights. Each has its own set of pros and cons, and what works best really depends on your situation, budget, and what kind of look you're going for.
Natural light is often the go-to for beginners because, well, it's free and readily available. Think about shooting near a window. The soft, diffused light coming from a large window can create really flattering results with minimal fuss. It's great for a more relaxed, approachable vibe. If you're shooting outdoors, look for open shade or overcast days. These conditions provide soft, even light that wraps around the face nicely, avoiding harsh shadows. Golden hour, that magical time just after sunrise or before sunset, can also offer beautiful, warm light that adds a lovely glow. However, natural light can be unpredictable. You're at the mercy of the weather and the time of day, which can limit your shooting schedule and consistency. If you're looking for a simple and effective way to get started, exploring portrait photography with natural light is a good idea.
On the other hand, studio lighting gives you a lot more control. With artificial lights, you can set up your lighting exactly how you want it, regardless of the time or weather. This consistency is a big plus for professional work. You can use modifiers like softboxes or umbrellas to shape the light, making it soft and flattering, or harder and more dramatic if that's the look you need. While studio setups can involve more equipment and a higher initial cost, they offer versatility. You can create a wide range of looks, from bright and airy to moody and dramatic. It takes practice to master, but the ability to dial in your lighting precisely is a significant advantage.
Here's a quick rundown:
Natural Light:
Pros: Free, accessible, often creates a soft and natural look, good for beginners.
Cons: Unpredictable, dependent on weather and time of day, less control.
Studio Light:
Pros: Consistent, predictable, high degree of control, versatile for different looks.
Cons: Requires equipment investment, can have a learning curve, and potentially higher cost.
Ultimately, the choice between natural and studio light comes down to your specific needs. For a quick, budget-friendly option with a natural feel, window light is fantastic. If you need consistent, controlled results and the flexibility to create various moods, investing in studio lighting is the way to go. Many photographers find a balance, using studio lights to supplement natural light or to achieve specific effects that nature can't provide on demand.
If you're just starting out and on a tight budget, you can achieve great results with a single light source and a reflector. As you get more comfortable, you can gradually add more equipment. Remember, the goal is to create a flattering image, and both natural and studio light can help you get there.
Three-Point Headshot Lighting Setup for Balanced Illumination
The three-point lighting setup is a classic for a reason. It's a reliable way to get a well-lit, professional-looking headshot, especially for corporate and LinkedIn photos. Think of it as having three lights working together to sculpt the face.
Here's how it breaks down:
Key Light: This is your main light source. Position it about 45 degrees to the side of your subject, pointing towards their opposite shoulder. You want it bright enough to light up the face, but not so harsh that it creates deep shadows. Adjusting its angle can change how shadows fall on the face, so play around with it a bit.
Fill Light: This light sits opposite the key light, also around 45 degrees from the subject. Its job is to soften those shadows created by the key light. You don't want it as bright as the key light; its purpose is to fill in the dark areas so you can see details without making the face look flat.
Back Light (or Hair Light): This light goes behind the subject, usually angled down from above. It separates the subject from the background and adds a nice highlight to the hair or the back of the head. For people with very light or no hair, you might skip this or use it very subtly to avoid glare.
The goal is to create a balanced look where the face is clearly visible and has dimension, without harsh shadows or blown-out highlights.
When setting this up, keep a few things in mind:
Don't position the key light too far to the side, or one eye might get lost in shadow.
Try not to have the lights too high, as this can create unflattering shadows under the eyes. Aim for a level that lights up the eyes well.
Keep the lights reasonably close to the subject. The further away they are, the less impact they'll have.
Be careful with the fill light's power. Too much can wash out the effect of the key light and make the subject uncomfortable.
This setup is popular because it offers control. You can adjust each light independently to fine-tune the look, making it adaptable to different faces and desired moods. It's a solid foundation for almost any professional headshot.
How to Adjust Shadows and Highlights in Your Headshot Lighting Setup
Getting the shadows and highlights just right is what separates a decent headshot from a really polished one. It's all about controlling the light and how it falls on your subject's face. You don't want shadows that are too dark, making it hard to see features, but you also don't want everything so bright that it looks flat and lifeless.
Think of your main light, the key light, as the primary source. It sets the overall mood. Then, you have your fill light, which is usually softer and positioned opposite the key light. Its job is to gently lift those shadows, making sure details aren't lost. A reflector can do this job too, bouncing light back into the darker areas. Sometimes, using a black reflector instead of a white one can create a more dramatic effect by deepening shadows, which can be useful for certain looks, but you have to be careful it doesn't make the subject look harsh.
Here are a few things to watch out for:
Deep-set eyes: If your subject has eyes that are set back, you might need to lower your key light a bit. This helps to get more light into those eye sockets, preventing them from looking too shadowy. You want those catchlights to be visible.
Jawline definition: For subjects who might want to define their jawline, you can position the key light a little higher. This will cast more shadow under the chin, creating a more sculpted look. Just be mindful not to raise it so high that you lose the catchlights in the eyes.
Hair: If someone has dark hair, it naturally creates a shadow on the side of their face. You might not need a strong fill light or a dark reflector in this case, as the hair is already doing some of the work. A white reflector might be enough to balance things out.
The goal is to create a balanced look where the face is well-lit without being blown out, and shadows add dimension without obscuring important features. It often takes a bit of tweaking to find that sweet spot. You might adjust the power of your lights, change their position slightly, or swap out your reflector for something different. For instance, using a large umbrella as a modifier can help soften the light and fill in shadows more evenly, which is a common technique in studio lighting setups.
Adjusting light is like sculpting with illumination. You're not just pointing a light; you're shaping how the light interacts with the contours of the face to bring out the best features and create a professional, approachable image. It's a subtle art that makes a big difference in the final output.
Headshot Lighting Setup Tips for Corporate Office Environments
Photographing headshots in a corporate office setting presents unique challenges, but also some distinct advantages. Unlike a controlled studio, you're working with existing ambient light and potentially limited space. The goal is to make the environment work for you, not against you.
The most important thing is to find a clean, uncluttered background that doesn't distract from the subject. Look for areas with plain walls, or use a portable backdrop if available. Natural light from windows can be your best friend here. Position your subject near a window, but not in direct sunlight, which can be too harsh. The window acts as a large, soft light source. If the window light is too strong, use a sheer curtain or a white bounce card to soften it further.
When using artificial lights in an office, be mindful of the existing office lighting. Fluorescent lights can cast an unpleasant green or blue tint. It's often best to turn off overhead office lights and rely on your own setup. A simple one or two-light setup usually suffices.
Here’s a basic approach:
Key Light: Position a soft light source (like a softbox or umbrella) about 45 degrees to the side of your subject and slightly above eye level. This will create gentle shadows that give dimension to the face.
Fill Light (Optional): If the shadows created by the key light are too deep, you can add a second light on the opposite side, set to a lower power, or use a reflector to bounce light back into the shadow areas.
Background Light (Optional): If you want to separate your subject from the background, a light pointed towards the background can help. Be careful not to let it spill onto your subject.
When working in an office, always be aware of your surroundings. Minimize disruption to employees and be prepared to adapt your setup based on the available space and power outlets. A portable battery-powered light can be a lifesaver in these situations.
Consider the time of day. Early morning or late afternoon light can be softer and more flattering than midday sun. If you're using a flash, a bounce card or a small diffuser can help soften the light and prevent harsh shadows, especially if you're working with limited space and can't position the flash far from the camera.
Best Headshot Lighting Setup for LinkedIn Profile Photos
When it comes to LinkedIn, you want a headshot that looks professional, approachable, and clear. The goal is to make a good first impression on potential employers or clients. A simple, clean lighting setup usually works best here. Think about what makes a photo pop on a small screen while still looking polished.

The three-point lighting setup is a solid choice for LinkedIn headshots because it creates balanced illumination and dimension. It uses three lights: a key light, a fill light, and a backlight (or kicker light).
Here’s a breakdown of how you might set that up:
Key Light: This is your main light. Position it about 45 degrees to the side of your subject and slightly above eye level. It should be softened with a modifier like a large umbrella or a softbox to avoid harsh shadows. This light does most of the heavy lifting in terms of illuminating the face.
Fill Light: This light is placed on the opposite side of the key light, usually at a lower power setting. Its job is to soften any shadows created by the key light, bringing out detail without eliminating all shadow.
Backlight (Kicker Light): This light comes from behind the subject, often from a higher angle and to the side. It helps separate the subject from the background, adding a subtle rim of light around the hair or shoulders. This gives the photo depth and prevents the subject from looking flat against the background.
For LinkedIn, the emphasis is on clarity and approachability. Overly dramatic lighting can sometimes be distracting. A well-lit, clean image that shows the subject clearly is usually the most effective. The goal is to look professional, not overly stylized.
Adjusting the intensity and position of these lights is key. You want enough light to see the details clearly, but not so much that it looks blown out. For LinkedIn, a slightly brighter, more open look often works well. It conveys confidence and openness. You can also use a reflector to bounce light back into the shadow areas if you're only using one or two lights, which can be a more budget-friendly option.
Final Adjustments: Achieving a Polished, Professional Look with Your Headshot Lighting Setup
So, you've got your lights set up, maybe you're using that classic three-point setup or just a single key light with a reflector. That's great! But before you hit the shutter button for real, there are a few little things you can do to really make that headshot pop. It’s all about those small tweaks that take a good photo to a really professional one.
First off, take a good look at your subject. Everyone's face is different, right? What works for one person might not be ideal for another. For instance, if someone has a bit of a double chin they're self-conscious about, you might want to raise your main light a little higher. This casts subtle shadows that can help define the jawline. Just be careful not to raise it so high that you lose those nice little catchlights in their eyes – those are super important for making the eyes look alive.
Pay attention to the details. Small adjustments to light placement and modifiers can make a big difference in how flattering and professional the final image appears. It's often the subtle refinements that truly elevate a headshot.
Consider the hair, too. If your subject has long, dark hair, it might already create a nice dark edge, so you might not need a reflector on that side at all, or you could even use a black reflector to deepen the shadow and add some drama. On the flip side, if someone has deep-set eyes, you might want to bring your main light down a bit, maybe even to eye level, to make sure those eyes are well-lit and don't look too shadowed.
Here are a few things to check:
Catchlights: Are they visible and well-placed in both eyes? They add life and sparkle.
Shadows: Are they soft and flattering, or harsh and distracting? Adjust your light's distance or modifier if needed.
Highlights: Is the light hitting the high points of the face (like cheekbones and forehead) without blowing out details?
Background: Is it clean and distraction-free? If you're using lights for the background, ensure they're not spilling onto your subject in an unwanted way.
Sometimes, I'll even use a reflector on the side opposite the main light. A white reflector bounces light back, filling in shadows. But if you want a more dramatic look, you can try a black reflector (sometimes called a negative fill). This absorbs light, making the shadows darker, and can even help slim the face a bit. Just remember, if you go too dark, you might lose detail in the shadow areas, so it’s a balancing act.
Don't be afraid to experiment a little. Take a few test shots after making these adjustments. What looks good on camera might not translate perfectly in the final image. It’s all about getting that balance just right to make your subject look their absolute best.
Want your headshots to look super professional and polished? Getting the lighting just right is key! We've got tips to help you nail that perfect look. Ready to make your photos shine? Visit our website today to learn more and book your session!
Frequently Asked Questions
-
The three-point lighting setup is a very popular and proven method for taking professional headshots. It uses three lights to make sure the face is lit up nicely and evenly. This setup works well for pictures used on company websites or professional profiles like LinkedIn.
-
Yes, natural light can be great for headshots, especially if you have a large window. Light coming from a window can be softened with curtains to create a pleasant look. If you're outside, find a spot with soft, indirect sunlight, like in the shade of a building.
-
Clamshell lighting uses two lights placed in front of the person being photographed, one above and one below, like a closed clamshell. This method creates soft shadows and nice highlights, making the face look balanced and flattering. It's often used for actors or modern business photos.
-
To avoid harsh light and dark shadows, it's important to soften your lights. You can do this by using tools like softboxes or umbrellas with your lights. These tools spread the light out, making it gentler and more pleasing on the face.
-
In a lighting setup, the 'key light' is the main, brightest light that illuminates the subject. The 'fill light' is a softer light used to lighten up the shadows created by the key light, making sure details are visible and the face isn't too dark on one side.